Unlock the 5 Secret Tips for Irresistible Homemade Chocolate Wafers with Vanilla Cream
Are you tired of store-bought cookies that lack that homemade touch? Craving the perfect balance of crispy chocolate wafers and creamy vanilla filling? Look no further! In this article, we’ll reveal five game-changing secrets that will transform your baking game and help you create the most delectable homemade chocolate wafers with vanilla cream. Whether you’re a seasoned baker or a kitchen novice, these tips will elevate your cookies to bakery-quality status. And if you’re in the mood for more chocolatey goodness, don’t forget to check out our Simple Chocolate Cake recipe for another crowd-pleasing dessert. Get ready to impress your family, friends, and even yourself with these mouthwatering treats, including those made with Nabisco chocolate wafers!

- The Perfect Chocolate Wafer: It’s All in the Cocoa
The foundation of any great chocolate wafer lies in the quality of cocoa used. For the richest, most intense chocolate flavor, opt for Dutch-processed cocoa powder. This type of cocoa has been treated with an alkalizing agent, resulting in a smoother, less bitter taste that’s perfect for wafers. Using high-quality ingredients can make your homemade versions as tasty as Nabisco chocolate wafers.
Pro tip: Bloom your cocoa powder by mixing it with hot water before adding it to your dough. This simple step intensifies the chocolate flavor and creates a deeper color.
Did you know? According to a survey by the National Confectioners Association, chocolate remains America’s favorite flavor, with 92% of consumers indulging in chocolate candy.
- Achieving the Perfect Crunch: Temperature Control is Key
The secret to perfectly crisp wafers lies in precise temperature control during baking. Preheat your oven to 350°F (175°C) and use an oven thermometer to ensure accuracy. Bake your wafers for 10-12 minutes, rotating the baking sheet halfway through for even browning. Even with Nabisco chocolate wafers, understanding temperature control can make a difference.
Crunch hack: For extra crispiness, leave the wafers in the turned-off oven with the door slightly ajar for an additional 5 minutes after baking.
- Vanilla Cream Perfection: The Power of Real Vanilla
When it comes to the cream filling, artificial vanilla extract simply won’t cut it. Invest in high-quality pure vanilla extract or, better yet, use vanilla bean paste for those beautiful flecks and intense flavor. This will complement your wafers nicely, whether they are homemade or Nabisco chocolate wafers.
Flavor boost: Add a pinch of salt to your vanilla cream to enhance the sweetness and create a more complex flavor profile.
- The Binding Secret: Proper Emulsion Techniques
To achieve a smooth, lump-free cream filling, proper emulsion is crucial. Start by creaming room temperature butter until light and fluffy, then gradually add powdered sugar while mixing on low speed. Slowly drizzle in heavy cream and vanilla, increasing the speed to medium-high for a light, airy texture. Emulsifying correctly can make your cream just right for pairing with Nabisco chocolate wafers.
Texture tip: For an ultra-smooth filling, sift your powdered sugar before adding it to the butter to eliminate any lumps.
- Assembly Mastery: The Chilling Method
For picture-perfect sandwich cookies, patience is key. After baking, allow your wafers to cool completely on a wire rack. Meanwhile, chill your vanilla cream filling for at least 30 minutes before assembling. This ensures that the filling holds its shape and doesn’t ooze out when you bite into the cookie. Whether using your recipe or Nabisco chocolate wafers, this method will work wonders.
Presentation hack: Use a piping bag with a star tip to create beautifully swirled cream centers that will wow your guests.

Frequently Asked Questions:
Q: Can I make these cookies ahead of time? A: Absolutely! The chocolate wafers can be baked and stored in an airtight container for up to a week. Assemble with the cream filling a few hours before serving for the best texture.
Q: How can I make these cookies gluten-free? A: Simply substitute the all-purpose flour with a gluten-free flour blend that contains xanthan gum. You may need to adjust the liquid slightly, so start with less and add as needed to achieve the right dough consistency.
Q: Can I freeze these cookies? A: Yes! Both the baked wafers and the assembled cookies freeze well. For best results, freeze the wafers and cream separately, then assemble after thawing. This works great for stockpiling Nabisco chocolate wafers too.
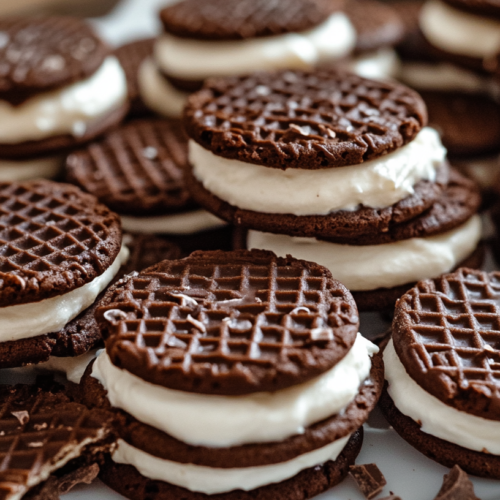
Chocolate wafers with cream
Ingredients
- 4 pc eggs
- 1 cup powdered sugar
- 1 cup flour
- 3 tbsp cocoa powder
- 1 packet baking powder
- 1 packet vanilla sugar
For the cream
- 1 liter milk
- 4 tbsp potato or corn starch
- 5 cups powdered sugar
- 2 pc eggs
- 100 g butter
- 1 packet vanilla sugar
- 400 ml whipped cream
For the glaze
- 200 ml whipped cream
- 100 g milk chocolate
Instructions
- Beat eggs and sugar until frothy and add sifted flour mixed with cocoa and baking powder in portions. Place the dough on a baking sheet lined with baking paper (the larger the sheet, the lower the dough) and bake in a preheated oven at 180 ° C for 20 minutes.
- After baking, let cool on a rack.
- For the cream, bring the milk, flour, starch, powdered sugar and eggs to a thick pudding.
- Remove from heat and stir with butter and vanilla sugar while still hot. Melt the butter and sugar in it while stirring. I stirred it with a hand mixer and the cream turned out nice and smooth. Let it get cold.
- Finally, whip the cream until stiff and stir into the pudding with a whisk. Halve the cream.
- Spread one part on the cake (cut off the edge), sprinkle the crumbled edges over it, distribute the rest of the cream. Smooth out and put in a cool place.
- When the cream is really firm on the cake, the top is covered with a chocolate icing – to do this, heat the cream, add chocolate pieces and melt while stirring.


These chocolate wafers turned out perfectly crisp with just the right amount of sweetness, and the vanilla cream was smooth without being too heavy. I added a pinch of cinnamon to the cream for a little twist, and my family loved it. The recipe was easy to follow, though I had to watch the baking time closely to avoid over-browning.
These chocolate wafers turned out perfectly crisp with just the right amount of sweetness, and the vanilla cream was smooth without being too heavy. I added a pinch of cinnamon to the cream for a little twist, and my family loved it. The recipe was easy to follow, though I had to watch the baking time closely to avoid over-browning.
These chocolate wafers turned out perfectly crisp with just the right amount of sweetness, and the vanilla cream was smooth without being too heavy. I added a pinch of cinnamon to the cream for a little twist, and it paired so well with the dark chocolate. The recipe was easy to follow, though I had to watch the baking time closely to avoid over-browning.
These chocolate wafers turned out perfectly crisp with just the right amount of sweetness, and the vanilla cream was smooth without being too heavy. I added a pinch of cinnamon to the cream for a little extra warmth, and my kids couldn’t stop sneaking bites while I was assembling them. The tips on chilling the dough really made a difference in getting those clean, even slices.
These wafers turned out perfectly crisp with just the right amount of sweetness, and the vanilla cream was smooth without being too heavy. I added a pinch of cinnamon to the cream for a little twist, and my family couldn’t stop eating them. The tips on chilling the dough made rolling it out so much easier—no more sticky mess!
These chocolate wafers turned out perfectly crisp with just the right amount of sweetness, and the vanilla cream was silky smooth. I added a pinch of cinnamon to the cream for a little twist, and it paired so well with the dark chocolate. The recipe was easy to follow, though I had to chill the dough a bit longer than suggested to get clean slices.
These chocolate wafers turned out perfectly crisp with just the right amount of sweetness, and the vanilla cream was smooth without being too heavy. I added a pinch of cinnamon to the cream for a little twist, and it paired so well with the dark chocolate. The recipe was straightforward, though I had to watch the baking time closely to avoid over-browning.
These chocolate wafers turned out perfectly crisp with just the right amount of sweetness, and the vanilla cream was smooth without being too heavy. I was skeptical about chilling the dough first, but it made rolling it out so much easier—my kids even helped without making a huge mess. Definitely keeping this recipe for our weekend baking sessions.
These chocolate wafers turned out perfectly crisp with just the right amount of sweetness, and the vanilla cream was smooth without being too heavy. I added a pinch of cinnamon to the cream for a little twist, and my family loved it. The recipe was easy to follow, though I had to watch the baking time closely to avoid over-browning.
These chocolate wafers turned out perfectly crisp with just the right amount of sweetness, and the vanilla cream was smooth without being too heavy. I added a pinch of cinnamon to the cream for a little extra warmth, and my family loved it. The recipe was easy to follow, though I had to watch the baking time closely to avoid over-browning.
These chocolate wafers turned out perfectly crisp with just the right amount of sweetness, and the vanilla cream was smooth without being too heavy. I added a pinch of cinnamon to the cream for a little extra warmth, and my family loved it. The tips on chilling the dough made rolling it out so much easier—no more sticky mess!
These chocolate wafers turned out perfectly crisp with just the right amount of sweetness, and the vanilla cream was silky smooth. I was worried about getting the layers even, but the tips made it so much easier—my kids couldn’t stop sneaking bites while I was assembling them. Definitely keeping this recipe for our next family gathering.
These chocolate wafers turned out perfectly crisp with just the right amount of sweetness, and the vanilla cream was smooth without being too heavy. I was a little worried about rolling the dough thin enough, but your tip about chilling it first made it so much easier. My kids loved helping me sandwich the cream between the layers—definitely a new family favorite.
These chocolate wafers turned out perfectly crisp with just the right amount of sweetness, and the vanilla cream was smooth without being too heavy. I added a pinch of cinnamon to the cream for a little twist, and my family loved it. The recipe was easy to follow, though I had to watch the baking time closely to avoid over-browning.
These chocolate wafers turned out perfectly crisp with just the right amount of sweetness, and the vanilla cream was smooth without being too heavy. I added a pinch of cinnamon to the cream for a little extra warmth, and my family loved it. The recipe was easy to follow, though I had to watch the baking time closely to avoid over-browning.
These chocolate wafers turned out perfectly crisp with just the right amount of sweetness, and the vanilla cream was smooth without being too heavy. I added a pinch of cinnamon to the cream for a little extra warmth, and it paired so well with the dark chocolate. The recipe was straightforward, though I had to watch the baking time closely to avoid overbrowning.
These chocolate wafers turned out perfectly crisp with just the right amount of sweetness, and the vanilla cream was smooth without being too heavy. I added a pinch of cinnamon to the cream for a little twist, and my kids couldn’t stop sneaking bites while I was assembling them. The recipe was straightforward, though I had to watch the baking time closely to avoid over-browning.